1 Configuring your environment
This chapter walks you through preparing a complete Node.js development environment from scratch. You begin by installing a current Node.js release with ES6 support and confirming the setup from the command line. The lesson explains options for managing versions (such as a Node version manager to switch among releases), the inclusion of npm with Node.js, and why your system PATH matters for finding executables. It also shows how to verify installations and troubleshoot basic terminal errors so you can confidently run Node and npm on macOS, Windows, or Linux.
With Node in place, you set up the tools you’ll use to write and ship code. The chapter recommends installing a capable text editor (with Atom as an example) or an IDE for added conveniences like integrated terminals and debugging. It then covers software configuration management and deployment basics: installing Git, making commits, and preparing to deploy with Heroku by creating an account, installing the Heroku CLI for your platform, and logging in from the terminal. Together, these steps establish a workflow that moves code from local development to production.
Finally, you take Node for a “test drive” in the interactive REPL. By launching the shell from the terminal, you can evaluate JavaScript expressions, print output, declare variables with modern ES6 syntax, and even define classes and instantiate objects on the fly. The chapter notes that core modules are available in REPL and highlights handy REPL commands for editing, loading, saving, getting help, and exiting. You’re encouraged to experiment with quick snippets and exploration in this sandbox as a fast feedback loop during development.
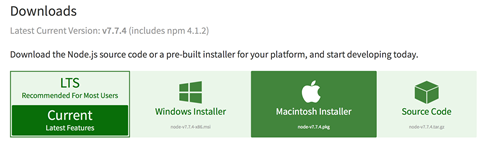
Node.js installer page
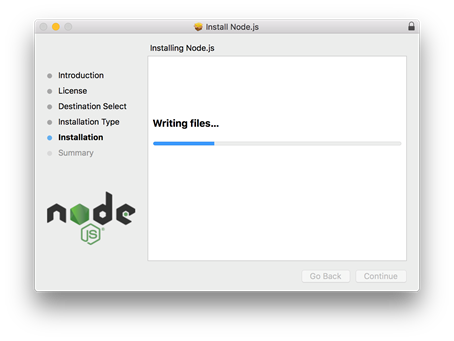
Node.js writing to your machine
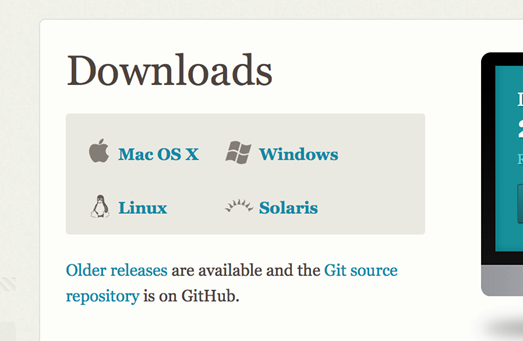
Installing Git from the downloads page
Summary
In this lesson, you installed the Atom text editor and Node.js. You also verified that your Node.js environment is ready to evaluate JavaScript code by running some commands in REPL. In the next lesson, you learn how to use Node.js and terminal to build and launch an application.
FAQ
What does this lesson help me set up?
Node.js (with ES6 support), a code editor, basic SCM and deployment tools (Git and the Heroku CLI), and the Node.js REPL so you can run JavaScript from your terminal.Which version of Node.js should I install and why?
Install Node.js 9.3.0 or later so you have ES6 (ECMAScript 2015) features available. In general, use the latest stable Node.js release as you progress.What’s the simplest way to install Node.js?
Go to https://nodejs.org/en/download/ and run the installer for your OS (macOS, Windows, or Linux). Follow the prompts; the installer adds Node.js and npm to your system.How can I manage multiple Node versions? What about Windows?
- macOS/Linux: Use NVM (Node Version Manager). Typical steps: 1) install NVM with the provided curl script, 2) runnvm list, 3) run nvm ls-remote to see available versions, 4) nvm install 9.3.0, 5) verify with node -v.- Windows: NVM isn’t supported. Use nvm-windows (https://github.com/coreybutler/nvm-windows) or nodist (https://github.com/marcelklehr/nodist).
How do I verify Node.js and npm are installed and find where they live?
- Check versions:node -v and npm -v.- Find locations: on macOS/Linux use
which node and which npm; on Windows use where node and where npm.- If you see errors or no output, retry installation or search the exact error message for common fixes.
What is the PATH variable and why might my terminal not find Node?
PATH is an environment variable listing directories that your terminal searches for executables. If Node/npm aren’t on PATH, commands likenode or npm won’t be found. Re-run the installer or update your PATH to include the directories where Node and npm were installed.Which terminal and editor/IDE should I use?
- Terminal: The book uses UNIX-style shells (Bash). On Windows, you can use CMD, or install Git Bash from https://git-scm.com/downloads for a Bash-like experience.- Editor: Atom (https://atom.io) is recommended, but an IDE like Visual Studio Code (https://code.visualstudio.com/) also works well.
How do I start, use, and exit the Node REPL? Any handy commands?
- Start: runnode to enter REPL; the prompt changes to >.- Exit: type
.exit or press Ctrl+C twice.- Helpful REPL commands:
.help, .exit, .break/.clear, .editor (Ctrl+D to save/quit), .load <file>, .save <file>.- You can evaluate JS expressions, log output, define variables/classes, and instantiate objects interactively.
How do I set up Git and what basic commands will I need?
- Check/install: rungit --version. If missing, download from https://git-scm.com/downloads.- Basics in a project:
git init, then add files with git add <path> or git add ., and save a snapshot with git commit -m "message".How do I install the Heroku CLI and log in?
- macOS: install Homebrew (https://brew.sh) then runbrew install heroku/brew/heroku (or use the installer).- Windows: use the installer from https://devcenter.heroku.com/articles/heroku-cli#windows.
- Linux: run the install script from https://cli-assets.heroku.com/install-ubuntu.sh.
- Log in: run
heroku login and enter your Heroku account email and password. Get Programming with Node.js ebook for free